آموزش ایجاد صحنه واقعی در 3ds Max و VRay
Creating a Photorealistic Scene with 3ds Max and V-Ray
ایجاد صحنه واقعی در 3ds Max و VRay
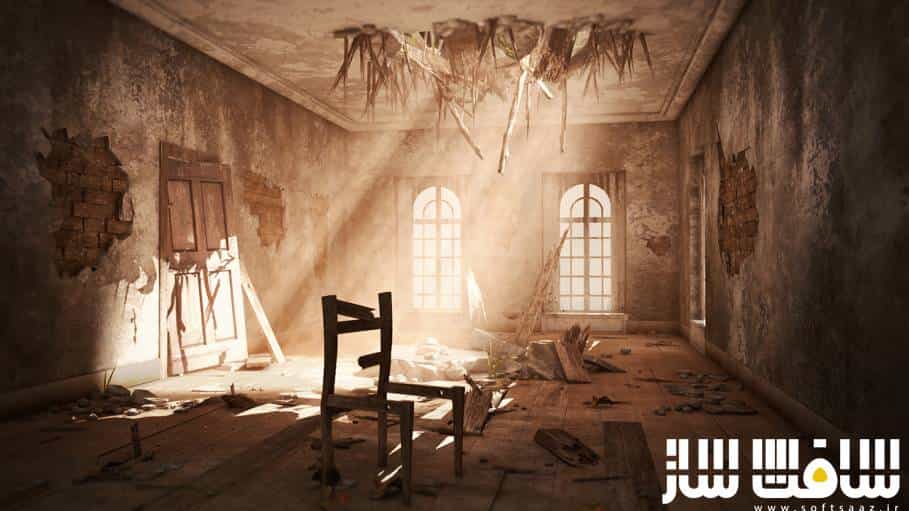
در این آموزش فوق العاده کاربردی از شرکت Pluralsight ، مربی دوره zaheer mukhtar ، با استفاده از ابزارهای متعددی در نرم افزار 3ds Max به ایجاد یک صجنه واقعی و رزق و برق دار می پردازد. اگه میخواهید که به سرعت و با یک رندر عالی ، یک صحنه داخلی رو طراحی کنید ، این دوره مناسب شماست ، بلوکه کردن کانسپت ، اضافه کردن جزییات ، اضافه کردن خاک و آوار ، رندر پاس چندگانه ، از جمله مواردی ست که در این دوره مشاهده خواهید نمود با سافت ساز همراه باشید.
عناوین اصلی این دوره آموزشی:
- سفارش سازی رابط کاربری
- بلوک کردن اشکال اولیه
- تنظیمات دوربین
- ایجاد دهانه برای پنجره
- ایجاد قاب برای پنجره و اضافه کردن جزییاب
- ایجاد تخته کف
- ایجاد درب و قاب درب
- ایجاد شکاف در سقف
- ایجاد ترک روی دیوار
- ایجاد جزییات حاشیه دیوار و سقف
- ساخت شیشه سکسته برای پنجره
- ایجاد متریال کامپوزیت برای دیوار
- تکسچرینگ پنجره با متریال کامپوزیت
- تنظیمات پلاگین Debris Maker
- تولید عناصر آوار با پلاگین Debris Maker
- اضافه کردن آجر به دیوار
- اضافه کردن جزییات آوار به زمین و سقف
- تنظیمات V-Ray برای تست رندرینگ
- تنظیمات Global Illumination
- تنظیمات V-Ray Lights
- افزدون جهت نور و سایه به صحنه
- رفع مسائل مش
- اضافه کردن مه محیط به صحنه
- تنظیمات پاس V-Ray برای رندر نهایی
- کامپوزیت Render Pass در فتوشاپ
- و …

لطفا قبل از دانلود پیش نمایش دوره را مشاهده فرمایید:
عنوان دوره : Pluralsight – Creating a Photorealistic Scene with 3ds Max and V-Ray
سطح : متوسط
زمان کل دوره : 4 ساعت و 54 دقیقه
تعداد فایل های تصویری : 43
سال آموزش : 2016
فایل تمرینی : دارد
مربی دوره : Zaheer Mukhtar
نرم افزار : 3ds Max 2014 , V-Ray 3.2 , Photoshop CC
زیرنویس : ندارد
Pluralsight – Creating a Photorealistic Scene with 3ds Max and V-Ray
Quickly developing scenes that look ultra-realistic can be difficult if you don’t have the proper tools to do it well. In this course, Creating a Photorealistic Scene with 3DS Max and V-Ray, you will learn how to create a gorgeous, photorealistic render with ease and efficiency. First, you’ll learn how to block out the concept. Second, you’ll use tools in 3ds Max to add large details. Third, you’ll discover how to add dirt and debris and finally, render multiple passes. When you’re finished with this 3ds Max course, you’ll not only be able to create gorgeous renders, but also be able to quickly use these tools to do the same with any scene you need.
1 Course Overview 01:29
2 Author and Course Introduction 01:05
3 Customizing User Interface in 3ds Max 03:37
4 Looking into Reference Images and Gathering Ideas 06:44
5 Blocking Out the Basic Shape 08:40
6 Setting the Camera 05:13
7 Creating Openings for Windows 04:51
8 Creating Window Frame 06:14
9 Adding Details to the Window 08:26
10 Creating Floor Planks 08:16
11 Creating Door 08:31
12 Creating the Frame For the Door 09:06
13 Creating Crack for the Ceiling 09:06
14 Adding Cracks to the Walls 08:47
15 Adding Base to the Windows 08:16
16 Adding Border Details to Ceiling and Walls 08:30
17 Creating Broken Glass for Windows 07:12
18 Fixing Mesh Issues for Proper Texturing 03:03
19 Creating Composite Material for Walls 08:18
20 Fixing Normals of the Walls 03:20
21 Texturing Windows with Composite Material 07:15
22 Texturing Floor Planks 07:01
23 Analyzing Material for the Roof 04:18
24 Setting Up Debris Maker Plugin 04:54
25 Generating Debris Elements using Debris Maker 09:25
26 Adding Broken Planks to the Floor 09:03
27 Adding Bricks to the Walls 09:00
28 Using Scattered Object to Place Small Debris on Floor 07:14
29 Adding Detailed Debris to Broken Roof and Ground 09:07
30 Setting up V-Ray for Test Rendering 06:45
31 Setting up Global Illumination 05:33
32 Setting up V-Ray Lights 05:53
33 Adding Directional Lights and Shadows to the Scene 07:40
34 Fixing Mesh Issues and Adding More Lights 08:42
35 Adding Details to Walls, Roof and Specular Maps to Texture 08:02
36 Finalizing the Lighting Setup 08:34
37 Adding Environmental Fog to the Scene 09:02
38 Setting up V-Ray Passes for Final Render 10:41
39 Analyzing Render Passes 05:58
40 Compositing Render Passes in Photoshop 06:08
41 Adding Z-Depth Pass to Achieve Depth of Field 05:03
42 Comparing Different Types of Composited Images 08:04
43 Conclusion 02:13
حجم کل :

برای دسترسی به کل محتویات سایت عضو ویژه سایت شوید
برای نمایش این مطلب و دسترسی به هزاران مطالب آموزشی نسبت به تهیه اکانت ویژه از لینک زیر اقدام کنید .
دریافت اشتراک ویژه
مزیت های عضویت ویژه :
- دسترسی به همه مطالب سافت ساز بدون هیچ گونه محدودیتی
- آپدیت روزانه مطالب سایت از بهترین سایت های سی جی
- بدون تبلیغ ! بله با تهیه اکانت ویژه دیگه خبری از تبلیغ نیست
- دسترسی به آموزش نصب کامل پلاگین ها و نرم افزار ها
اگر در تهیه اشتراک ویژه مشکل دارید میتونید از این لینک راهنمایی تهیه اشتراک ویژه رو مطالعه کنید . لینک راهنما
For International user, You can also stay connected with online support. email : info@softsaaz.ir telegram : @SoftSaaz
امتیاز
جمع امتیاز
لطفا به این آموزش امتیاز بدهید