دانلود آموزش نرم افزار UVLayout
Introduction to UVLayout

آموزش نرم افزار UVLayout
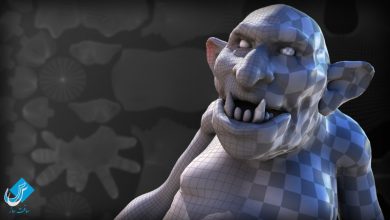
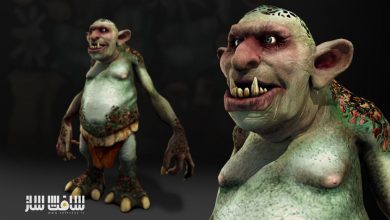
همان طور که همه هنرمندان و سه بعدی کاران می دانند ، فرآیند درست کردن یو وی ها بعد از مدلینگ جسم سه بعدی کاری بسیار سخت و زمانبری است ، در مواقعی، کار بسیار وحشتناک می شود ! اما با وجود نرم افزاری مستقل و ساده به نام uvlayout اینکار در مدت زمان خیلی کمتر و در عین حال دقیق تر و ساده تر امکان پذیر است.
در این آموزشاز سایت pluralsight یاد می گیریم که چگونه مدل سه بعدی رو وارد محیط برنامه و داخل نرم افزار ناوبری بکنیم و سپس چگونه شروع به تولید uv ها و چگونه مدل های پیچیده را تقسیم کنیم و در ادامه به راه حل هایی برای بر طرف کردن انواع مشکلات عادی رخ داده می پردازیم و در کل آموزش ما ابزارها و منوی مهم و کاربردی نرم افزار را با هم بررسی خواهیم کرد با سافت ساز همراه باشید.
عناوین اصلی این دوره آموزشی:
- بارگذاری مش
- ناوبری و پنل نمایش UVLayout
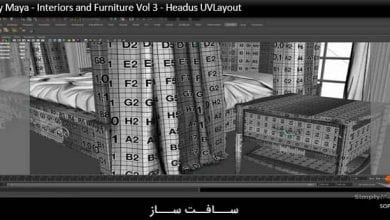
- Cutting, splitting و dropping
- بهینه سازی UV
- جوشکاری UV
- پیش نمایش UV با نقشه های تکسچر
- مخفی ، نمایان و علامتگذاری هندسه
- کار با تقارن
- تنظیم دستی UV
- بسته بندی UV
- کپی کردن UV به هندسه
- بخش بندی مدلهای سطح سخت
- کار با فایلهای موقت
- و …

لطفا قبل از دانلود پیش نمایش دوره را مشاهده فرمایید:
عنوان دوره : Digital Tutors – Introduction to UVLayout
سطح : مبتدی
زمان کل دوره : 2 ساعت و 59 دقیقه
تعداد فایل های تصویری : 20
سال آموزش : 2013
فایل تمرینی : دارد
مربی دوره : Eddie Russell
نرم افزار : UVLayout 2.08.01 Professional
زیرنویس : ندارد
Digital Tutors – Introduction to UVLayout
Laying out UVs is often times a painstaking process that many artists dread. Well those days are over because using Headus UVLayout to create your UVs is not only quick and easy but it’s also fun. To get things started we’ll first learn how to bring in our geometry, navigate around it and customize the display of UVLayout to our liking. From here we will dive right in and learn how to cut our geometry apart, drop it into the UV view and begin flattening it out and optimizing it. After we’ve learned to cut things up, it’s only logical that we learn how to weld things back together which by the way is just as easy as cutting it apart. Next we will learn how to resolve potential problems that may arise in the flattening process by manipulating individual points in our mesh. Several other topics you will learn about in this course include symmetry, snapping and stacking of UVs, packing UVs together and copying UVs from one piece of geometry to another. To wrap this course up, we’ll even learn about some tools included in UVLayout that will help us quickly create a UV map for our hard surface models. After completing this course, you should be ready to dive into Headus UVLayout and quickly create UVs for your own models.
Introduction and project overview
Loading meshes
Navigation and the UVLayout display panel
Cutting, splitting and dropping
Flattening and optimizing UVs
Welding UVs
Welding
Previewing UVs with texture maps
Hiding, revealing, and marking geometry
Working with symmetry
Manually adjusting UVs
Marking polygons and transformations
Pinning and straightening
Snapping and stacking UVs
Packing UVs together
Copying UVs to other geometry
Laying out revolved surfaces
Scaling and smoothing UVs
Segmenting hard surface models
Finding and fixing UV overlaps
Saving and working with temporary files
حجم کل :

برای دسترسی به کل محتویات سایت عضو ویژه سایت شوید
برای نمایش این مطلب و دسترسی به هزاران مطالب آموزشی نسبت به تهیه اکانت ویژه از لینک زیر اقدام کنید .
دریافت اشتراک ویژه
مزیت های عضویت ویژه :
- دسترسی به همه مطالب سافت ساز بدون هیچ گونه محدودیتی
- آپدیت روزانه مطالب سایت از بهترین سایت های سی جی
- بدون تبلیغ ! بله با تهیه اکانت ویژه دیگه خبری از تبلیغ نیست
- دسترسی به آموزش نصب کامل پلاگین ها و نرم افزار ها
اگر در تهیه اشتراک ویژه مشکل دارید میتونید از این لینک راهنمایی تهیه اشتراک ویژه رو مطالعه کنید . لینک راهنما
For International user, You can also stay connected with online support. email : info@softsaaz.ir telegram : @SoftSaaz
امتیاز
جمع امتیاز
لطفا به این آموزش امتیاز بدهید