آموزش ترمیم عکس در فتوشاپ Photoshop
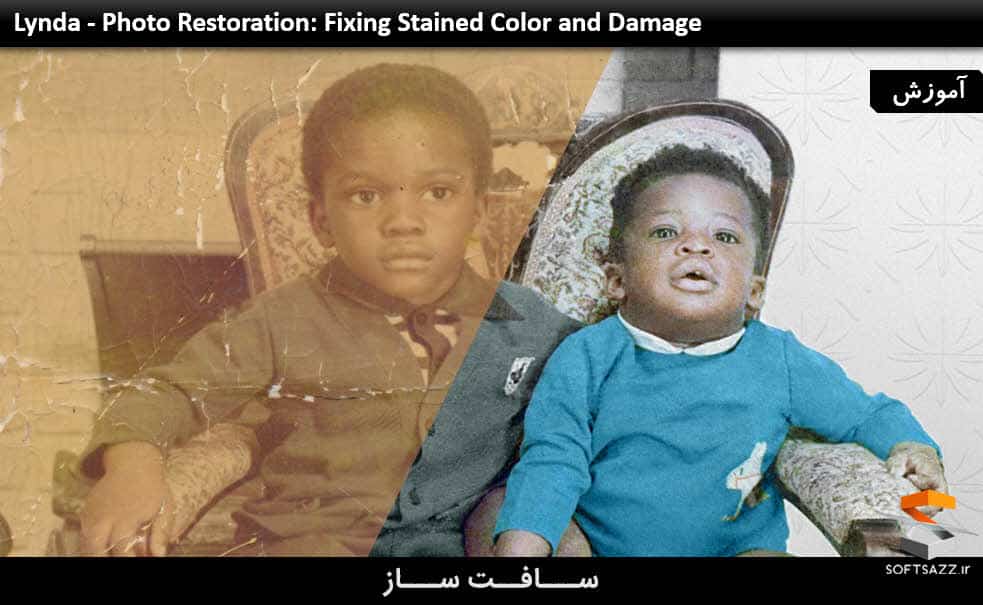
Photo Restoration: Fixing Stained Color and Damage
ترمیم عکس در فتوشاپ
عکس های رنگی قدیمی اغلب نه تنها کم رنگ شده اند بلکه لکه، ترک ، و آسیب های دیگری هم دارند. بازسازی این گونه تصاویر، مستلزم یادگیری مهارت های تصحیح رنگ است.در این دوره ” ترمیم عکس در فتوشاپ ” از Lynda ، استاد بازسازی تصاویر “نیل رادرز” چگونگی استفاده از فتوشاپ برای احیا و ترمیم کلی آسیبها, کمرنگی ها و رنگ کردن لکەها را نشان می دهد.
او در ابتدا چگونگی ارزیابی و طرح ریزی شیوەی بازسازی عکس را نشان می دهد. و در ادامه, تنالیته رنگ ها و ترمیم کلی آسیب ها را توضیح میدهد. و در نهایت, چگونگی دوبارە رنگ کردن یک تصویر و اضافه کردن تغییرات نهایی را نشان می دهد.با سافت ساز همراه باشید .
عناوین دوره ترمیم عکس در فتوشاپ :
- طرح ریزی بازسازی
- تنظیم رنگ دستی تصاویر
- وارد کردن غلظت و تراکم رنگ بر روی نواحی کم رنگ
- رفع کلی آسیبها
- انتخاب رنگ و امادە سازی لایەها
- روتوش نهایی
- و …

پیشنمایش دوره ترمیم عکس در فتوشاپ :
عنوان دوره : Lynda – Photo Restoration: Fixing Stained Color and Damage
سطح : پیشرفته
زمان کل دوره : 1.13 ساعت
تعداد فایل های تصویری : 14
سال آموزش : 2017
فایل تمرینی : دارد
مربی دوره : Neil Rhodes
نرم افزار : Photoshop
زیرنویس : ندارد
Lynda – Photo Restoration: Fixing Stained Color and Damage
Old color photos are often not only faded, but also have stains, cracks, and other damage. Restoring such images involves refining your photo-recoloring skills. In this course, master restorationist Neil Rhodes shows how to use Photoshop to fix overall damage, fading, and color staining. He begins by showing how to assess an image and map out a restoration strategy. Next, he explains how to fix the overall tonality and repair the damage. To wrap up, he demonstrates how to recolor an image and add the final touches.
Topics include:
Planning the restoration
Manual color adjustments
Building density on the faded areas
Fixing most of the damage
Selecting color and preparing layers
Final clean up
1. Evaluation and Planning
Plan the restoration 2m 1s
2. Simple Color and Fading/Tone Fixes
Manual color adjustments 5m 48s
Build density on the faded areas 3m 49s
3. Restoring the Damage
Fix most of the damage 6m 32s
Repair the arm of the chair 6m 45s
Clean up the background and add wallpaper 11m 38s
4. Coloring
Select color and prepare layers 5m 10s
Color the chair 4m 57s
Color the carpet, wood, and clothing 12m 23s
5. Final Steps
Final clean up 11m 52s
حجم کل :

برای دسترسی به کل محتویات سایت عضو ویژه سایت شوید
برای نمایش این مطلب و دسترسی به هزاران مطالب آموزشی نسبت به تهیه اکانت ویژه از لینک زیر اقدام کنید .
دریافت اشتراک ویژه
مزیت های عضویت ویژه :
- دسترسی به همه مطالب سافت ساز بدون هیچ گونه محدودیتی
- آپدیت روزانه مطالب سایت از بهترین سایت های سی جی
- بدون تبلیغ ! بله با تهیه اکانت ویژه دیگه خبری از تبلیغ نیست
- دسترسی به آموزش نصب کامل پلاگین ها و نرم افزار ها
اگر در تهیه اشتراک ویژه مشکل دارید میتونید از این لینک راهنمایی تهیه اشتراک ویژه رو مطالعه کنید . لینک راهنما
For International user, You can also stay connected with online support. email : info@softsaaz.ir telegram : @SoftSaaz
امتیاز به این مطلب :
امتیاز سافت ساز
لطفا به این مطلب امتیاز دهید :)