آموزش ایجاد موشن ترکینگ در افترافکت After Effects
After Effects Futuristic Graphics

آموزش ایجاد موشن ترکینگ
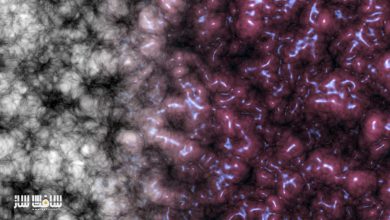
در این دوره مبتدی – متوسط آموزش ایجاد موشن ترکینگ از شرکت Udemy ، مربی دوره طیف وسیعی از تکنیک ها برای ایجاد و انیمیشن برخی از گرافیک های futuristic درنرم افزار After Effects را آموزش می دهد. در بخش 1 و 2 دوره ، به ایجاد یک گرافیک دایره ایی و یک گرافیک مستطیل شکل در افترافکت می پردازیم.
کار روی لایه های شکلی ، استفاده از افکت های استروک ، کار با ابزار توکار distribution و alignment و … را در این دوره آموزشی ارائه شده در سافت ساز ، یاد خواهیم گرفت. در بخش بعدی آموزش ، به نحوه متحرک سازی و انیمیشن دادن به گرافیک ها و اشکال ساخته شده ، انیمیشن دادن با کی فریم های پایه و برخی اکسپرژن های ساده ، استفاده از انیمیشن های پیچیده بدون تنظیم هر کی فریمی! می پردازیم.
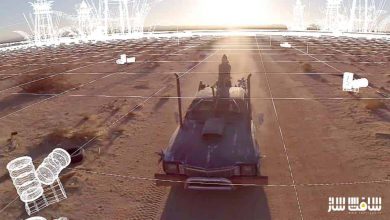
همچنین چگونگی انیمیت دادن به لایه های فضای 3D و کار با دوربین ها برای ایجاد مسیر را کار خواهیم کرد. در نهایت نحوه قرار دادن همه در یک قطعه نهایی ، تکنیک های استفاده شده برای کلید رنگی صفحه نمایش سبز ، چگونگی موشن ترک یک فوتیج live-action و قرار دادن گرافیک های انیمیشن شده در بالای فوتیج لایو اکشن را یاد خواهیم گرفت. با سافت ساز همراه باشید.
عناوین اصلی آموزش ایجاد موشن ترکینگ :
- ایجاد و طراحی گرافیکی شما با ابزارهای توکار افترافکت
- انیمیشن دادن به گرافیک های شما با کی فریم های پایه و اصطلاحات ساده
- دست یابی به یک کلید رنگی صفحه سبز
- موشن ترک فوتیج لایو اکشن
- کامپوزیت گرافیک های انیمیشن شده
- و …

لطفا قبل از دانلود پیش نمایش دوره را مشاهده فرمایید:
عنوان دوره : Udemy – After Effects Futuristic Graphics
سطح : مناسب برای همه
زمان کل دوره : 1.30 ساعت
تعداد فایل های تصویری : 40
سال آموزش : 2016
فایل تمرینی : ندارد
مربی دوره : Duncan Rogoff
نرم افزار : After Effects
زیرنویس : ندارد
Udemy – After Effects Futuristic Graphics
The first two sections will cover creating a rectangular graphic and a circular graphic from scratch entirely inside of After Effects. You’ll gain knowledge of the AE layout as well as where to find some of the software’s most important, and commonly used, tools. We’ll discuss working with shape layers, using the stroke effect, After Effects’ built-in alignment and distribution tools, and loads of other good stuff. The following two sections is where the fun begins as you learn how to animate your graphics and watch them come to life. I’ll cover animating with basic keyframes and teach you some simple expressions you can use to achieve complex animations without actually setting any keyframes! You’ll also learn how to animate your layers in 3D space, and how to work with the camera to create depth.
Finally, I’ll teach you how to put it all together for a final piece! You’ll learn the techniques used to get a clean green screen color key, how to motion track live-action footage, and how to place your already animated and completed graphics on top of the live-action footage to create the final look.
Section 1: After Effects: Futuristic Graphics OVERVIEW
Section 2: Creating the Rectangular Graphic
Lecture 2 Creating the Main Rectangle 06:19
Lecture 3 Making the Square Grid 04:48
Lecture 4 Creating Additional Elements 05:52
Lecture 5 Generating Random Text 02:02
Lecture 6 Section 2 OUTRO00:24
Section 3: Creating the Circular Graphic
Lecture 7 Creating the First Shape 02:04
Lecture 8 Working with the Stroke Effect01:52
Lecture 9 Repeating the Process 03:53
Lecture 10 Creating Additional Elements 01:54
Lecture 11 The Audio Spectrum Effect 04:07
Lecture 12 Creating Depth 02:14
Lecture 13 Creating the Radar04:27
Lecture 14 Section 3 OUTRO 00:36
Section 4: Animating the Rectangular Graphic
Lecture 15 Animating the Initial Bars 06:49
Lecture 16 Animating the Main Rectangle 02:02
Lecture 17 Animating the Square Grid Using Expressions02:36
Lecture 18 Animating the Main Text Using Animation Presets 02:46
Lecture 19 Animating the Bottom Strokes 03:43
Lecture 20 Animating the Status Bars 07:48
Lecture 21 Animating the Random Text 01:28
Lecture 22 Section 4 OUTRO 00:41
Section 5: Animating the Circular Graphic
Lecture 23 Section 5 Overview01:02
Lecture 24 Animating the Initial Ring 01:16
Lecture 25 Repeating the Process 02:58
Lecture 26 Animating the Radio Waves 01:45
Lecture 27 Animating the Triangles 00:36
Lecture 28 Animating the Text 03:08
Lecture 29 Arranging in 3D Space 02:56
Lecture 30 Animating the 3D Layers 02:46
Lecture 31 Working with the Camera 02:48
Lecture 32 Section 5 OUTRO 00:49
Section 6: Compisiting the Final Scene
Lecture 33 Section 6 Overview 00:21
Lecture 34 Getting a Clean Greenscreen Key 03:10
Lecture 35 Motion Tracking Live-Action Footage 02:08
Lecture 36 Setting Up the Main Composition 01:04
Lecture 37 Compositing the Rectangular Graphic 02:23
Lecture 38 Compositing the Circular Graphic 03:36
Lecture 39 Section 6 OUTRO 00:53
حجم کل :

برای دسترسی به کل محتویات سایت عضو ویژه سایت شوید
برای نمایش این مطلب و دسترسی به هزاران مطالب آموزشی نسبت به تهیه اکانت ویژه از لینک زیر اقدام کنید .
دریافت اشتراک ویژه
مزیت های عضویت ویژه :
- دسترسی به همه مطالب سافت ساز بدون هیچ گونه محدودیتی
- آپدیت روزانه مطالب سایت از بهترین سایت های سی جی
- بدون تبلیغ ! بله با تهیه اکانت ویژه دیگه خبری از تبلیغ نیست
- دسترسی به آموزش نصب کامل پلاگین ها و نرم افزار ها
اگر در تهیه اشتراک ویژه مشکل دارید میتونید از این لینک راهنمایی تهیه اشتراک ویژه رو مطالعه کنید . لینک راهنما
For International user, You can also stay connected with online support. email : info@softsaaz.ir telegram : @SoftSaaz
امتیاز به این مطلب :
امتیاز سافت ساز
لطفا به این مطلب امتیاز دهید :)