تکسچرینگ کاراکتر بازی در فتوشاپ Photoshop
Texturing Low Polygon Game Characters in Photoshop
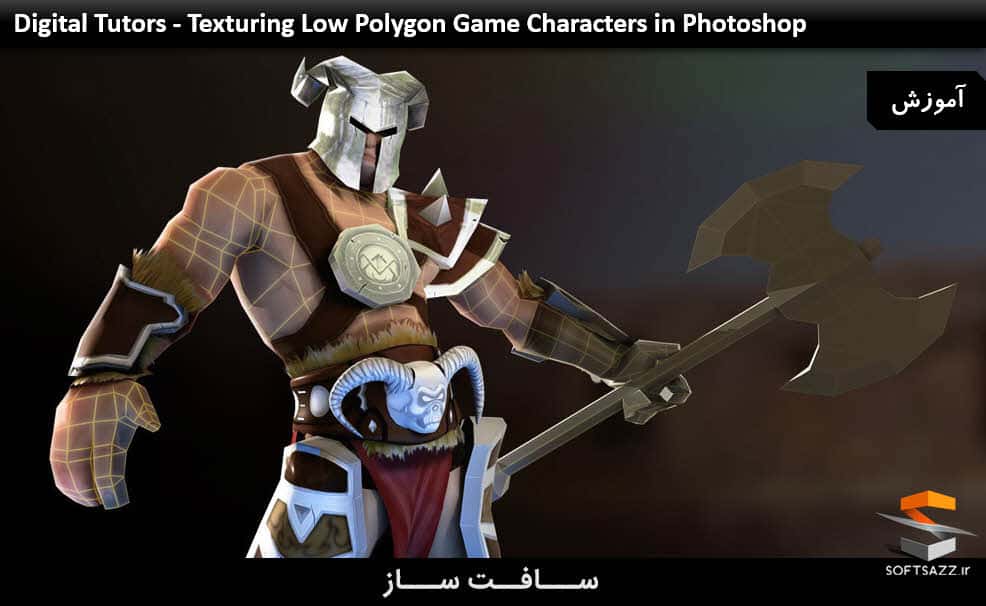
تکسچرینگ کاراکتر بازی در فتوشاپ
در این دوره ” تکسچرینگ کاراکتر بازی در فتوشاپ ” ما اصول تکسچرینگ (بافت دهی ) کارکتر ها را در فتوشاپ پوشش می دهیم. ما با آماده سازی فتوشاپ به روشی که بهینه است برای نقاشی کردن تکسچر (بافت) شروع خواهیم کرد ، سپس شروع به نقاشی بیس کالر (رنگ پایه )، های لایت ها و سایه ها می کنیم. وقتی که از رنگ دهی راضی شدیم، تصحیح کردن تکسچر را تا وقتی که از نتیجه راضی شویم ادامه می دهیم. با سافت ساز همراه باشید .
عناوین دوره تکسچرینگ کاراکتر بازی در فتوشاپ :
- Unwrapping سر ، دست و پا ، زره ،کمربند ، تبر و …
- کشیدن و پالایش تصویر
- تکسچرینگ اعضای بدن کاراکتر
- و …

پیشنمایش دوره تکسچرینگ کاراکتر بازی در فتوشاپ :
عنوان دوره : Digital Tutors – Texturing Low Polygon Game Characters in Photoshop
سطح : متوسط
زمان کل دوره : 12 ساعت
تعداد فایل های تصویری : 62
سال آموزش : 2012
فایل تمرینی : دارد
مربی دوره : Joshua Kinney
نرم افزار : 3ds Max 2012, Photoshop CS4
زیرنویس : ندارد
Digital Tutors – Texturing Low Polygon Game Characters in Photoshop
In this series of tutorials, we cover the fundamentals of texturing characters in Photoshop. We will start off by setting up our Photoshop document in a way that will be optimal for texture painting. Then we’ll start laying down our base colors, highlights, and shadows. Once we’re happy with our color selection, we’ll continually refine the textures until we’re happy with the result. Software required: 3ds Max 2012, Photoshop CS4.
Lesson 1 Introduction and project overview
Lesson 2 Unwrapping the head
Lesson 3 Unwrapping the torso
Lesson 4 Unwrapping the arms and legs
Lesson 5 Unwrapping the hands
Lesson 6 Unwrapping the final pieces of the body
Lesson 7 Unwrapping the shoulder armor and chest plate
Lesson 8 Unwrapping the gloves and the helmet
Lesson 9 Unwrapping the belt
Lesson 10 Unwrapping the knee and hip guards
Lesson 11 Unwrapping the axe
Lesson 12 Consolidating our UV clusters
Lesson 13 Setting up our UV’s in Photoshop
Lesson 14 Sketching the features of the face and torso
Lesson 15 Sketching the features of the arms and legs
Lesson 16 Applying the sketch texture to the model
Lesson 17 Blocking in the highlights of the body
Lesson 18 Blocking in the shadows of the face
Lesson 19 Refining the face
Lesson 20 Adding warmth to the face
Lesson 21 Adding stubble to the face
Lesson 22 Finalizing the face
Lesson 23 Adjusting skin tone
Lesson 24 Blocking the shadows of the torso
Lesson 25 Refining the chest texture
Lesson 26 Blending the back texture
Lesson 27 Adding warmth to the torso
Lesson 28 Blocking in the texture of the arms
Lesson 29 Refining the texture of the arms
Lesson 30 Adding warmth to the arms
Lesson 31 Blocking and refining the leg texture
Lesson 32 Finishing the leg texture
Lesson 33 Blocking in the colors of the hand
Lesson 34 Finishing the texture of the hand
Lesson 35 Identifying possible issues while texturing
Lesson 36 Texturing the foot
Lesson 37 Texturing the undergarment
Lesson 38 Creating the texture for the ear
Lesson 39 Texturing the eye
Lesson 40 Creating the asymmetrical elements of the face
Lesson 41 Fixing seams
Lesson 42 Retrieving our texture from our 3D file
Lesson 43 Creating the texture for the chest plate
Lesson 44 Painting the design of the chest plate
Lesson 45 Creating the texture of the helmet
Lesson 46 Creating the values for the knee pads
Lesson 47 Creating the leather for the shoulder armor
Lesson 48 Finishing the first set of armor texture
Lesson 49 Creating the values of the skull for the belt
Lesson 50 Creating the values for the horns
Lesson 51 Creating the values for the belt
Lesson 52 Finishing up the belt
Lesson 53 Laying down the values for the hip guards
Lesson 54 Creating the texture for the gloves
Lesson 55 Painting the cloth elements of the belt
Lesson 56 Blocking in color for the armor
Lesson 57 Finalizing the color of the armor
Lesson 58 Sketching the straps for our armor
Lesson 59 Texturing the straps
Lesson 60 Creating buckles for the straps
Lesson 61 Creating the texture for the axe head
Lesson 62 Creating the texture for the axe handle
دانلود با لینک مستقیم و سرعت بالا :

برای دسترسی به کل محتویات سایت عضو ویژه سایت شوید
برای نمایش این مطلب و دسترسی به هزاران مطالب آموزشی نسبت به تهیه اکانت ویژه از لینک زیر اقدام کنید .
دریافت اشتراک ویژه
مزیت های عضویت ویژه :
- دسترسی به همه مطالب سافت ساز بدون هیچ گونه محدودیتی
- آپدیت روزانه مطالب سایت از بهترین سایت های سی جی
- بدون تبلیغ ! بله با تهیه اکانت ویژه دیگه خبری از تبلیغ نیست
- دسترسی به آموزش نصب کامل پلاگین ها و نرم افزار ها
اگر در تهیه اشتراک ویژه مشکل دارید میتونید از این لینک راهنمایی تهیه اشتراک ویژه رو مطالعه کنید . لینک راهنما
For International user, You can also stay connected with online support. email : info@softsaaz.ir telegram : @SoftSaaz
امتیاز دهی به این مطلب :
امتیاز سافت ساز
لطفا به این مطلب امتیاز دهید ☺️