آموزش اسکچ تا حجاری در ZBrush برای چاپ سه بعدی
From Sketch to 3D Print – Collectible Sculpting in ZBrush for 3D Printing

آموزش اسکچ تا حجاری در ZBrush
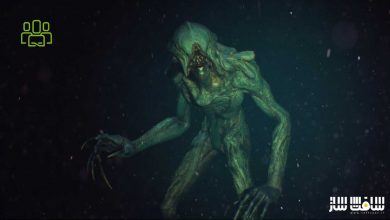
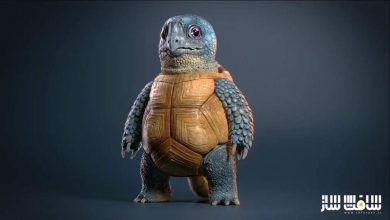
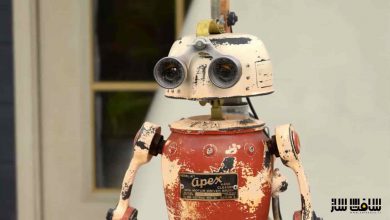
آموزش اسکچ تا حجاری در ZBrush : اگر قصد دارید که حجاری و اسکالپ را در زیبراش برای چاپ سه بعدی یاد بگیرید و نمیدانید از کجا شروع کنید ، این دوره برای شماست. در این دوره از هنرمند Kristi ، از یک اسکچ کانسپت شروع کرده و تا پایان یک پروژه و چاپ سه بعدی کار را ادامه می دهیم. این دوره برای کاربران مبتدی مناسب است. این دوره آموزشی توسط تیم ســافــت ســاز برای شما عزیزان تهیه شده است.
عناوین اصلی دوره آموزشی :
- طراحی برای ایده پردازی
- تنظیم فضای کاری برای دسترسی سریعتر به دکمه ها و براش های مورد استفاده
- مسدود سازی آناتومی و بررسی نسبت ها
- مواقع مناسب برای استفاده از داینامش،ZRemesher و Subdivsions
- پالی گروپینگ برای ریتوپولوژی سریع و کارآمد
- ورک فلوی سریع Remesh/Projection
- ترفندی جالب برای ایجاد براش های Insert Multi Mesh و جزییات بالا
- تست مجسمه برای اندازه گیری وزن و تعادل بدون پرینتر سه بعدی
- نحوه حجاری مو
- تقیسم پارت ها و پاکسازی همپوشانی ها
- آموزش فاصله های تحمل و کلید زنی
- استفاده از Panel loops،فولدرها،عملیات بولین برای پاکسازی قطعات
- نحوه سازماندهی کار ها
- آماده سازی فایل برای چاپ با ScaleMaster و 3D Print Hub
- بررسی حداقل ضخامت با ابزارهای کمکی
- اکسپورت فایلها به scale
- نمایش تست چاپ با Preform و Form3 printer

عنوان دوره : ArtStation – From Sketch to 3D Print – Collectible Sculpting in ZBrush for 3D Printing
سطح : مبتدی
زمان کل دوره : – ساعت
تعداد فایل های تصویری : 40
سال آموزش : 2021
فایل تمرینی : دارد
مربی دوره : Kristi
نرم افزار : ZBrush
زیرنویس انگلیسی : ندارد
ArtStation – From Sketch to 3D Print – Collectible Sculpting in ZBrush for 3D Printing
If you have ever wanted to learn how to create sculptures in ZBrush for 3D Printing, but don’t know where to start, this course is for you!
Starting from the concept sketch, I walk you through a typical figurine project , from concept art to 3D printed test prototype. This is the course I wish I had 3 years ago when I started to teach myself how to do this, scouring the deep recesses of the internet to find tutorials on things like parts-fit, keying, sculpting to scale, part tolerance, and more!
This is a very beginner friendly course. We cover a number of cross-discipline techniques, that, even if you are fairly new to ZBrush, you should be able to follow along. That said, this should probably not be your first time opening the program. :)
Here’s a glimpse at just a few things that we cover in this course:
SECTION 1: Sculpting with 3D Printing in mind
Starting with solid foundations that make things much easier when you go to print. Plus some general tips and tricks to working quickly in ZBrush.
Being your own concept artist – sketching for idea generation
Setting up your workspace for fast access to commonly used buttons/brushes
Anatomy Blocking and proportions overview
Dynamesh vs. ZRemesher vs. Subdivsions – when to use what to achieve the results you need
Polygrouping for fast and effective “retopology” and clean edge flows for great results
Speedy Remesh/Projection workflows
A cool trick to creating Insert Multi Mesh Brushes with High details that won’t blow up your computer!
Testing your sculpture for weight and balance — without a 3D printer!
How to sculpt hair that actually prints
Getting a ton of mileage out of default brushes – 90% of the sculpture is created with 3 standard brush types!
SECTION 2: Breaking down a Figure for 3D Printing – Garage Kit Style
I spill all my secrets around effective parts breakdown, and lay it out in a way that makes it easy to apply to your own work. It’s tricky business, and you need to be ready to puzzle-solve, but it’s very doable!
Splitting parts and cleaning up overlapping subtools
Learning about keying and tolerance gaps
Leveraging Panel loops, Folders, and Boolean operations to cleanly split parts in a non-destructive way
How to stay organized when you have a ton of subtools to work with!
Preparing your file to print using ScaleMaster & 3D Print Hub
Checking minimum thicknesses with helper tools
Exporting files to scale
Demonstrating a test print using Preform and a Form3 printer
حجم کل : 18.3 گیگابایت

برای دسترسی به کل محتویات سایت عضو ویژه سایت شوید
برای نمایش این مطلب و دسترسی به هزاران مطالب آموزشی نسبت به تهیه اکانت ویژه از لینک زیر اقدام کنید .
دریافت اشتراک ویژه
مزیت های عضویت ویژه :
- دسترسی به همه مطالب سافت ساز بدون هیچ گونه محدودیتی
- آپدیت روزانه مطالب سایت از بهترین سایت های سی جی
- بدون تبلیغ ! بله با تهیه اکانت ویژه دیگه خبری از تبلیغ نیست
- دسترسی به آموزش نصب کامل پلاگین ها و نرم افزار ها
اگر در تهیه اشتراک ویژه مشکل دارید میتونید از این لینک راهنمایی تهیه اشتراک ویژه رو مطالعه کنید . لینک راهنما
For International user, You can also stay connected with online support. email : info@softsaaz.ir telegram : @SoftSaaz
امتیاز به این مطلب :
امتیاز سافت ساز
لطفا به این مطلب امتیاز بدید 🦋