آموزش ساخت اولین مدل سه بعدی خود با Nomad Sculpt
Udemy – Creating your first 3D Model with Nomad Sculpt
آموزش ساخت اولین مدل سه بعدی خود با Nomad Sculpt
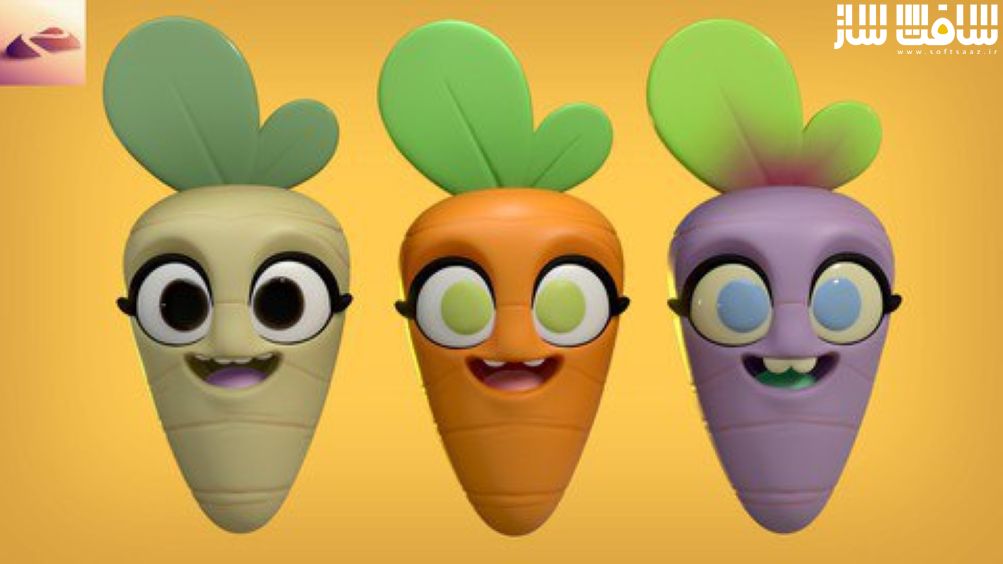
آموزش ساخت اولین مدل سه بعدی خود با Nomad Sculpt : در این دوره از هنرمند Dave Reed ، با نحوه طراحی کاراکتر ها با ساخت یک کاراکتر هویج اکسپرسیو بامزه با استفاده از Nomad Sculpt برای مبتدیان آشنا خواهید شد.
این دوره با اصول سه بعدی و استفاده از اشکال ساده برای طراحی و توسعه کاراکتر شروع میکند ،پس از یافتن بهترین اشکال ، شروع به طراحی ،دستکار و تنظیم شکل ظاهری آنها خواهد کرد.این دوره آموزشی توسط تیم ســافــت ســاز برای شما عزیزان تهیه شده است.
عناوین آموزش :
- تنظیم Canvas در Nomad Sculpt
- افزودن اشکال ساده و بدوی
- بلاکینگ مدل سه بعدی
- استفاده از ابزارها،نورپردازی و پست پراسسینگ برای تکمیل آن

عنوان دوره : Udemy – Creating your first 3D Model with Nomad Sculpt
سطح : متوسط
زمان کل دوره : 1.39 ساعت
تعداد فایل های تصویری : 6
سال آموزش : 2023
فایل تمرینی : ندارد
مربی دوره : Dave Reed
نرم افزار : Nomad Sculpt
زیرنویس انگلیسی : ندارد
Udemy – Creating your first 3D Model with Nomad Sculpt
Get started with Character Design and Development by learning the basics of 3D and using Simple Shapes. After finding and using the best shapes for our design, we’ll begin discovering how to manipulate and adjust them into the look we’re after. In this case, a cute carrot. Even the most simple 3D sculpts can actually be quite complicated depending on how much fine detail you want to put in. The good thing is that is what makes 3D with Nomad Sculpt fun!
– We’ll then move into adding eyes, eye lashes, and details to get it looking a bit more “real”.
– Setting up our carrot with the most flattering lighting possible and then adding color. Feel free to experiment
with colors and textures! Remember, this is your art so you don’t have to follow everything that I do. Rogues are welcome!
– Once we’ve finished with coloring and lighting we can start post processing and adjust the scene and character before export. Exporting or “Rendering” means you’ve successfully created your first 3D character! Or maybe it isn’t your first, but I hope you learned some new tricks and ways of thinking throughout!
The ideas and ways of thinking are most of what I want to leave you with…shapes are very easy to make, so just think of everything as shapes or part of shapes. Shapes within shapes even. I’ve found that even the most complicated sculpts aren’t so bad when I just break them down into one shape after another. Veggies for instance: A grape is pretty much a sphere. Banana is a stretched sphere. Cucumber slice is a cylinder. A snow cone is a cone with a sphere on top. As you continue to sculpt more and more you’ll find the shapes much easier and your sculpting will get faster and faster.
حجم کل : 2.1 گیگابایت

برای دسترسی به کل محتویات سایت عضو ویژه سایت شوید
برای نمایش این مطلب و دسترسی به هزاران مطالب آموزشی نسبت به تهیه اکانت ویژه از لینک زیر اقدام کنید .
دریافت اشتراک ویژه
مزیت های عضویت ویژه :
- دسترسی به همه مطالب سافت ساز بدون هیچ گونه محدودیتی
- آپدیت روزانه مطالب سایت از بهترین سایت های سی جی
- بدون تبلیغ ! بله با تهیه اکانت ویژه دیگه خبری از تبلیغ نیست
- دسترسی به آموزش نصب کامل پلاگین ها و نرم افزار ها
اگر در تهیه اشتراک ویژه مشکل دارید میتونید از این لینک راهنمایی تهیه اشتراک ویژه رو مطالعه کنید . لینک راهنما
For International user, You can also stay connected with online support. email : info@softsaaz.ir telegram : @SoftSaaz
امتیاز به این مطلب :
امتیاز سافت ساز
لطفا به این مطلب امتیاز بدید