آموزش Look Development و نورپردازی در Katana
FXPHD - Lighting and Look Development in Katana
آموزش Look Development و نورپردازی
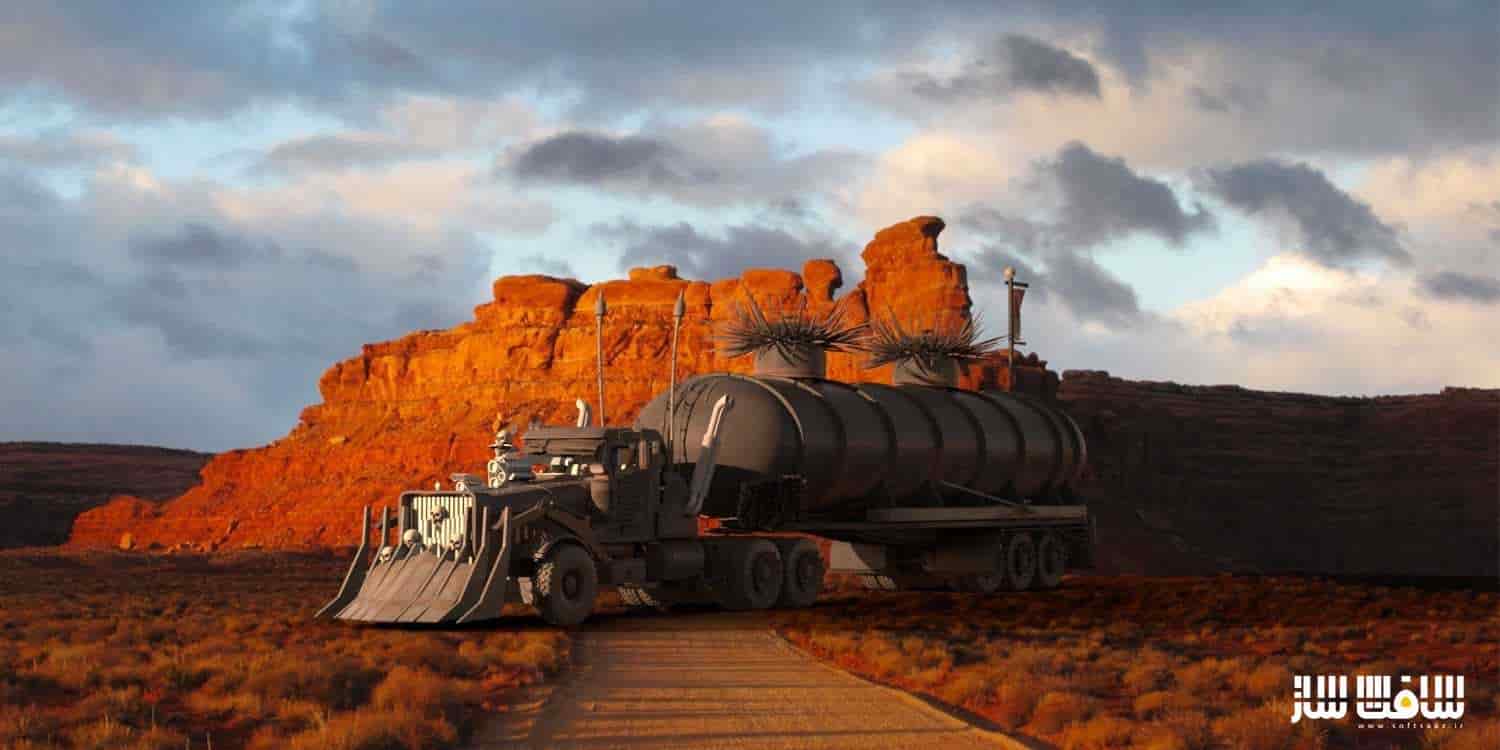
در این آموزش Look Development و نورپردازی از هنرمند Charles Chorein، تمامی جنبه های مربوط به نورپردازی و look development یک کامیون را در Katana و RenderMan 20 RIS در یک شات یکپارچه را یاد می گیرید. ایشان شروع به تهیه دارایی در مایا میکند و توسعه ظاهری و نورپردازی را در RenderMan 20 با RIS انجام می دهد.
این دوره به بررسی کامل نحوه ادغام یک آبجکت در یک شات با استفاده از Katana 2 و RenderMan 20 با RIS،تطبیق دوربین سی جی به یک دوربین واقعی ، تطبیق نورپردازی با یک صفحه و ادغام دارایی در یک شات می پردازد. همچنین تمامی شبکه شیدینگ با تکسچر از درس قبلی و از HDRI و نور فیزیکی برای تطبیق با واقعیت و ادغام دارایی ها در شات استفاده خواهیم کرد. این دوره آموزشی توسط تیم ســافــت ســاز برای شما عزیزان تهیه شده است.

عنوان دوره : FXPHD – Lighting and Look Development in Katana
سطح : متوسط
زمان کل دوره : 6.42 ساعت
تعداد فایل های تصویری : –
سال آموزش : 2016
فایل تمرینی : دارد
مربی دوره : Charles Chorein
نرم افزار : Katana
زیرنویس انگلیسی : ندارد
FXPHD – Lighting and Look Development in Katana
This course will cover all the aspects for the look development and lighting of a truck in Katana and RenderMan 20 RIS and integrate i tin a shot. Artist Charles Chorein will start to prepare the asset in Maya before switching in Katana for the look development and lighting in RenderMan 20 using RIS.
This course will take you through a full review of how to integrate an object in a shot with Katana 2 and RenderMan 20 using RIS, match a CG Camera to a reel Camera, match a lighting to a plate and integrate the asset in a shot. We will create all the shading network with the texture from the previous course, use HDRI and physicallight to match to the reality and integrate our asset in the shot.
course syllabus
CLASS 1
We explore the asset in Maya and set up everything to get ready for Katana. We will go through different technical checks to be sure the asset is ready for Katana and we will match our CG camera to the real camera.
CLASS 2
Before to start the lookDev, we need to put our truck on a layout and see the direction of the lighting and the camera point of view. We will explore the different issues we get from shooting with a real camera with the distortion and the sensor and convert them into the CG world.
CLASS 3
The HDRI will be our starting point to setup our lighting in Katana. We will see how to calibrate it for our needs. We will use Nuke to adjust the maps
CLASS 4
Now we have a balanced HDRI and a plate, we start to add some lights to integrate our truck in the background. At the end we will have a nice lightRig with our truck integrated with a grey shader.
CLASS 5
We now have a lightRig setup on a grey shader, so now we will focus on the different shader. We assign different materials for the truck. We will do a pre-shading of all our objects in the scene to have the intention of the materials.
CLASS 6
We set up all the textures with the shader we set up previously. We will see how the texture can have a huge impact on our lights and shaders and how to balance everything.
CLASS 7
We spend time adding more details in our texture and shaders to prepare the trunk to close up shots.
CLASS 8
We have finally everything in place in Katana/RenderMan, we now adjust the lighting, texture and shader to improve and balance everything.
CLASS 9
Now we have our beauty render, we need to prepare everything for the compositing, we will cover how to setup the render pass in Katana and the different AOV’s we will need in Nuke to improve the CG.
CLASS 10
We work in Nuke seeing how to use the different AOV’s and passes rendered in RenderMan, how to use the ZDepth and adjust the lighting in Nuke and finalize everything in 2D.
حجم کل : 3.1 گیگابایت

برای دسترسی به کل محتویات سایت عضو ویژه سایت شوید
برای نمایش این مطلب و دسترسی به هزاران مطالب آموزشی نسبت به تهیه اکانت ویژه از لینک زیر اقدام کنید .
دریافت اشتراک ویژه
مزیت های عضویت ویژه :
- دسترسی به همه مطالب سافت ساز بدون هیچ گونه محدودیتی
- آپدیت روزانه مطالب سایت از بهترین سایت های سی جی
- بدون تبلیغ ! بله با تهیه اکانت ویژه دیگه خبری از تبلیغ نیست
- دسترسی به آموزش نصب کامل پلاگین ها و نرم افزار ها
اگر در تهیه اشتراک ویژه مشکل دارید میتونید از این لینک راهنمایی تهیه اشتراک ویژه رو مطالعه کنید . لینک راهنما
For International user, You can also stay connected with online support. email : info@softsaaz.ir telegram : @SoftSaaz
امتیاز به این مطلب :
امتیاز سافت ساز
لطفا به این مطلب امتیاز بدید 🦋