آموزش ساخت یک کاراکتر سه بعدی انسان نمای واقعی
The Gnomon Workshop – Creating a Realistic Humanoid 3D Character
ساخت یک کاراکتر سه بعدی انسان نمای واقعی
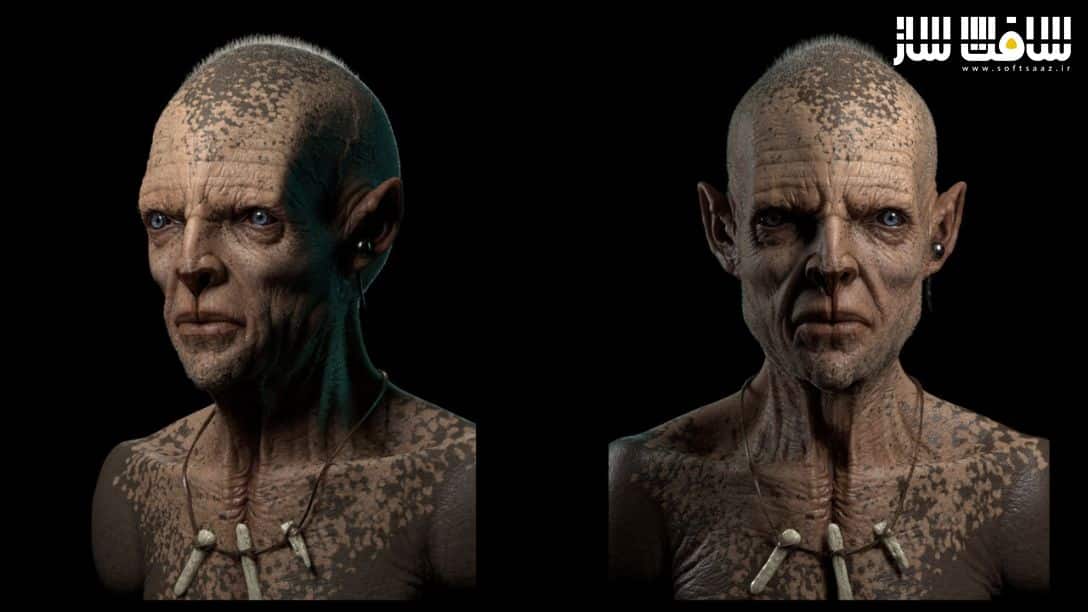
آموزش ساخت یک کاراکتر سه بعدی انسان نمای واقعی : در این دوره از هنرمند Babak Bina ، در 3.5 ساعت با فرآیند کامل خلق یک کاراکتر سه بعدی انسان نما، از کانسپت دو بعدی از طریق ZBrush، Maya و Mari تا رندر نهایی با استفاده از V-Ray آشنا خواهید شد.
ایشان نحوه ساخت یووی با استفاده از سیستم UV Master در زیبراش،تکسچرینگ در زیبراش، نحوه استفاده از قدرت ماسک ها در ترکیب با Polypainting برای حفظ تمامی جزییات حجاری شده،ایجاد کانال های مختلف در ماری،تنظیم نور برای رندر نهایی و استفاده از شیدرها در V-Ray را نشان خواهد داد. این دوره آموزشی توسط تیم ســافــت ســاز برای شما عزیزان تهیه شده است.

عنوان دوره : The Gnomon Workshop – Creating a Realistic Humanoid 3D Character
سطح : متوسط
زمان کل دوره : 3.57 ساعت
تعداد فایل های تصویری : –
سال آموزش : 2022
فایل تمرینی : ندارد
مربی دوره : –
نرم افزار : ZBrush – Maya – Mari – V-Ray
زیرنویس انگلیسی : ندارد
The Gnomon Workshop – Creating a Realistic Humanoid 3D Character
This 3.5-hour workshop shares the complete character creation process of a humanoid 3D character, from 2D concept, through ZBrush, Maya, and Mari to the final render using V-Ray. Revealing his entire thought process and 3D workflow, Babak Bina, a Character & Creature Design Lead at Zoic Studios, begins from a 2D concept that he takes into ZBrush to explore design possibilities, searching for interesting ways to execute and enhance the concept art while visualizing the character in 3D.
Once satisfied with the character model, Babak shows how to create a generic UV using ZBrush’s automated system, UV Master, which can be taken into Maya to prepare it for a multi-tiled workflow. The texturing also begins in ZBrush, where Babak discusses how to harness the strength of masks combined with Polypainting to maintain all your sculpted details.
With the base Polypaint created in ZBrush, the textures are then ready to export into Mari, where Babak walks through his tried-and-tested methods for creating different channels in Mari based on the Polypaint and displacement exported out of ZBrush. In the final portion of the workshop, Babak investigates the most effective lighting setup for the final render and walks through the shaders he creates in V-Ray.
This intermediate-level workshop assumes some working knowledge of the listed software and is aimed at sharing the industry standard practices, tips, and tricks Babak has learned and gathered throughout his years working as a character artist in the film industry.
حجم کل : 6 گیگابایت

برای دسترسی به کل محتویات سایت عضو ویژه سایت شوید
برای نمایش این مطلب و دسترسی به هزاران مطالب آموزشی نسبت به تهیه اکانت ویژه از لینک زیر اقدام کنید .
دریافت اشتراک ویژه
مزیت های عضویت ویژه :
- دسترسی به همه مطالب سافت ساز بدون هیچ گونه محدودیتی
- آپدیت روزانه مطالب سایت از بهترین سایت های سی جی
- بدون تبلیغ ! بله با تهیه اکانت ویژه دیگه خبری از تبلیغ نیست
- دسترسی به آموزش نصب کامل پلاگین ها و نرم افزار ها
اگر در تهیه اشتراک ویژه مشکل دارید میتونید از این لینک راهنمایی تهیه اشتراک ویژه رو مطالعه کنید . لینک راهنما
For International user, You can also stay connected with online support. email : info@softsaaz.ir telegram : @SoftSaaz
امتیاز به این مطلب :
امتیاز سافت ساز
لطفا به این مطلب امتیاز بدید