آموزش معماری در Unreal Engine 4 : طراحی داخلی و خارجی
Gumroad - Unreal Archviz Exterior and Interior Tutorial: The Garden Office
معماری در Unreal Engine
این مجموعه آموزشی معماری در Unreal Engine براساس درس های 1 تا 6 دوره آموزشی ایجاد گام به گام صحنه های خارجی و داخلی آرک ویز – دفتر باغ که در یوتیوب به صورت رایگان گذاشتم، می باشد.
در این 6 درس در مورد نحوه نورپردازی مورد نیاز برای یک صحنه داخلی و خارجی عالی و همچنین برخی از تکنیک های متریال که ما برای ساختن متریال با ظاهر واقعیتر از آنها استفاده میکنیم، صحبت خواهیم کرد.
این دوره معماری در Unreal Engine برای هنرمندان 3D، هنرمندان محیط، طراحان داخلی، معماران، توسعه دهندگان بازی که میخواهند کارشون رو با آنریل انجین 4 شروع کنند ، مناسب است. پیش نیاز این دوره ، مدلینگ پایه سه بعدی در استفاده از تری دی مکس است. با ســافــت ســاز همراه باشید.
در پایان این دوره آموزشی معماری در Unreal Engine :
- دانش آموزان یه تجربه عملی خواهند داشت و تنظیمات نورپردازی مورد نیاز برای ایجاد یه پروژه ویژوالیزیشن داخلی با ظاهر خوب را درک خواهند کرد.
- دانش آموزان قادر خواهند بود که تا کار آرک ویز در 3ds max انجام دهند و آن را به موتور آنریل انجین 4 برای ساخت یه واقعیت مجازی قابل پخش در لپ تاپ انتقال بدهند.
- دانش آموزش قادر به درک ورک فلوی عمومی استفاده از آنریل انجین 4 برای کار آرک ویز داخلی/خارجی خواهند بود.
- دانش آموزان روش های مختلف نورپردازی برای نوردهی صحنه های داخلی/خارجی می آموزند.
- دانش آموزان نودهای مختلف در material editor جهت ایجاد ظاهر خوب متریال را یاد می گیرند.
درس 7 – تنظیمات Swarm Agent برای سریعتر ساختن/رندرینگ نورپردازی :
- نحوه استفاده از swarm agent برای کمک به فرآیند ساخت نور
- دلیل و مفهوم Render Farm
- دانلود و نصب آنریل انجین روی Slave PCS
- انتخاب Swarm coordinator و چک کردن آی پی آدرس
- پیکربندی Swarm.exe در Slave PCs
- تست اولین ساخت خود
- معماری در Unreal Engine
درس 8 – ساخت نورپردازی داخلی و خارجی :
از مهارت های 6 درس اول برای ایمپورت و تنظیم متریال ها جهت صحنه داخلی مون استفاده میکنیم. در مورد تکنیک های نورپردازی ، lightmass ها ، استفاده از global illumination آنریل انجین ، ایجاد سایه های واقعی ، آنرپ دستی برخی از مش های بدون نیاز به افزایش رزولیشن lightmap را بحث خواهیم کرد .
- استفاده از درس های گذشته برای ایجاد صحنه داخلی
- Skylight با lightmass portal
- تنظیمات حهانی و تنظیمات Baselightmass.ini برای سایه های بسیار واقعی
- مطالعات پیشرفته Lightmass
- آنرپ UV lightmaps با استفاده از pelt mapping
- درس 9 – متریال های پیشرفته : متریال را به سطح بعدی می رسانیم.
- Tesselation و Bump Offset
- Lerp و Clamp
- Normal Multiplier
- متریال های بیس برای نمونه گیری
- افکت Moire
- متریال شیشه
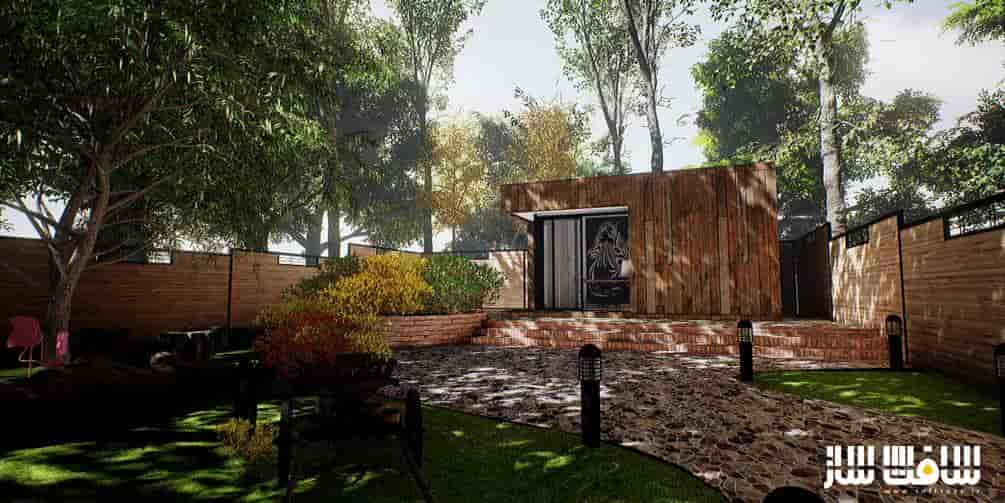
- تایم لپس برای فضای داخلی دفتر باغ
- متریال Mirror
- پخش ویدیو روی صفحه کامپیوتر
- ورتکس پینتینگ
درس 10 – ابزارهای شاخ و برگ (foliage ) و چشم انداز :
- ساخت صحنه خارجی رو استارت می زنیم.
- ابزارهای لنداسکیپ استفاده شده در دفتر باغ
- ساخت متریال شیشه :تکنیک های پیشرفته برای حذف افکت تایلینگ
- درختان از speedtree
- درختان از تری دی مکس
- انیمیشن باد روی درختان Non-Speedtree
- ابزارهای شاخ و برگ
- تایم لپس برای شبیه سازی خارجی دفتر باغ
درس 11 – نورپردازی فضای بیرون :
چگونگی تنظیم نورپردازی برای روشن کردن محوطه بیرونی منزل ، نحوه حذف مصنوعاتی که به سبب مدلهای نورپردازی بیرونی استفاده نموده ایم . همچنین نشان خواهم داد که چطور میتوانیم اثر نورپردازی در فضای باز را در زمان واقعی (ریل تایم) وقتی که بازیگر ما در خانه است، خاموش کنیم.
- مقدمه ایی بر نورپردازی فضای باز
- DFAO و movable skylight
- آثار ناشی از DFAO
- جایگزینی مش برای حذف آثار DFAO
- Lightmass و نورپردازی فضای باز
درس 12 – بهینه سازی و پست پراسس نهایی :
نحوه استفاده از LUT برای ایجاد خلق و خوی که میخواهیم و اینکه چطور میتوانیم وضوح صحنه خود را افزایش دهیم تا شفاف و روشن به نظر برسد. همچنین در مورد برخی از تکنیکهای بهینهسازی برای افزایش نرخ فریم پروژه بحث و گفتگو خواهیم کرد.
- مه
- Unsharp Masking
- LUT
- دیگر تنظیمات پست پراسس استفاده شده برای دفتر باغ
- بهینه سازی درختان با استفاده از کاهش خودکار LOD
- ترکیب مش ها برای کاهش تماس های نزدیک (draw calls)
- Post Process Volume برای فضای داخلی
- استفاده از بلوپرینت برای خاموش کردن Skylight
درس 13 – Sequencer و موزیک برای انیمیشن با کیفیت :
با استفاده از sequencer ، میتوانیم به ایجاد انیمیشن های زیبا در آنریل انجین بدون زمان رندر طولانی بپردازیم.
- نحوه استفاده از ابزارهای sequencer
- موزیک
- تنظیمات لنز
- گرفتن اسکرین شات های با رزولیشن بالا
- تولید فیلم برای پردازش بیشتر
درس 14 – ارائه پروژه :
نحوه تنظیم پروژه برای پرزنتیشن های مختلف، نحوه ارائه پروژه با استفاده از برنامه appstream گوشی همراه ، نحوه تنظیم پروژه برای کنترل حرکت با استفاده از یک کنترلر ، نحوه بسته بندی کردن پروژه برای واقعیت مجازی .
- حرکت به اطراف با استفاده از کنترل های لمسی
- NAV volume
- واقعیت مجازی و تنظیمات کنترلر

عنوان دوره : Gumroad – Unreal Archviz Exterior and Interior Tutorial: The Garden Office
سطح : مناسب برای همه
زمان کل دوره : – ساعت
تعداد فایل های تصویری : 6 درس
سال آموزش : 2016
فایل تمرینی : دارد
مربی دوره : unrealarchviztutpro
نرم افزار : Unreal Engine 4
زیرنویس : ندارد
Gumroad – Unreal Archviz Exterior and Interior Tutorial: The Garden Office
This tutorial series builds upon the lesson 1-6 fundamental lessons and guides you step by step on creating an exterior and interior archviz scene – The Garden Office.
We will teach you how to set up the lighting required for a good exterior and interior scene and also some materials technique that we use to make more realistic looking materials.
At the end of my course
1. Students will have a practical experience and understand the lighting setup needed in creating a good looking exterior+interior visualisation project.
2. Students will be able to take their Archviz work in 3ds max and transfer them into Unreal Engine 4 to make it ‘Playable’ in VR or touch based laptops
3. Students will be able to understand the general workflow of using the unreal engine 4 for their interior/exterior Archviz work.
4. Students will learn the different lighting methods use to light interior and exterior scenes
5. Students will learn various nodes in the material editor to create good looking materials
Who should take my course
1. 3d Artists, Environment Artists, Interior Designers, Architects, Game developers getting started with UE4.
2. Architect/Interior Design Students doing a final year piece
Prerequisites
1. Basic 3d Modelling using 3ds max
For a more detailed breakdown of the tutorial subject, please refer to below.
Lesson 7: Setting up Swarm Agent for faster light building/rendering
In this lesson, I will show you how we can use the swarm agent to hook up various PCs to help in the light building process (A.K.A Light Baking process). Getting good looking visualisations in UE4 requires lots of indirect lighting and shadow calculations. Setting up a ‘Swarm’ farm will help reduce the time needed for this process.
1) Reason and concept for ‘Render Farm’
2) Downloading and Installing Unreal Engine on Slave PCS.
3) Choosing Swarm coordinator and checking the IP address
4) Configuring the Swarm.exe in Slave PCs
5) Testing your first build
Lesson 8: Building the interior and interior lighting
In this lesson, we will use the skills gained in the first 6 lessons to import and setup the materials for our interior scene. We will also discuss the lighting techniques we will use if we are doing a pure interior scene and some lightmass(UE4’s global illumination solution) setting that is commonly used by artists to get realistic contact shadows.
I will also show how i manually unwrap some meshes to make an object look good without the need to increase its lightmap resolution.
1) Lesson 1-7 – Quick Recap of Past Lessons and use the lessons learnt to create interior scene.
2) Skylight with lightmass portal
3) World settings and Baselightmass.ini settings for realistic contact shadows.
4) Advanced Lightmass studies
5) Manually Unwrap UV lightmaps using pelt mapping
Lesson 9: Advanced Materials
In this lesson, we take our materials to the next level. I will show you some more commonly used materials that we can build for our project.
1) Tesselation and Bump Offset
2) Lerp and Clamp
3) Normal Multiplier
4) Base Material for instancing
5) Moire Effect
6) Our very own glass
7) Timelapse For Garden Office Interior
8) Mirror Material
9) Play video on computer screen
10) Vertex Painting
Lesson 10: Landscape and foliage tools
In this lesson, we begin to work on the exterior scene. I will show you how i create the grass material and a technique i use to remove the repeating pattern of the grass, so that it looks much more natural and real. I will also show you how we can optimize our trees for best visuals and best performance.
1) Landscape tools used in Garden Office
2) Grass materials – Advanced technique to remove tiling effect.
3) Trees from speedtree
4) Trees from 3dsmax
5) Wind animations on Non-Speedtree trees
6) Foliage tools
7) Time Lapse for The Garden Office Exterior
Lesson 11: Outdoor Lighting
In this lesson, i will show you the lighting setup that i use to light up our exterior scene. I will also discuss some of the techniques i use to remove the artifacts that arise due to the exterior lighting models that we use. I will also how we can turn off the outdoor lighting effect in real time when our actor goes indoor.
1) Introduction to outdoor lighting
2) DFAO and movable skylight
3) Artifacts due to DFAO
4) Replacement mesh to remove DFAO artifacts
5) Lightmass and outdoor lighting
Lesson 12: Final post process and optimization
Crank up the visuals by using post process techniques. I will show you how we can use our own LUT to create the mood we want, and how we can increase the sharpness of our scene so that it will look crisp and clear. I will also discuss some optimization techniques to increase the frame rates of our project.
1) Fog
2) Unsharp Masking
3) LUT
4) Other Post process settings used for the Garden Office
5) Optimizing trees using auto LOD reduction
6) Combining mes
دانلود با لینک مستقیم و سرعت بالا : 25 گیگابایت
دانلود رایگان درس 1 تا 6 که در یوتیوب نیز موجود است

برای دسترسی به کل محتویات سایت عضو ویژه سایت شوید
برای نمایش این مطلب و دسترسی به هزاران مطالب آموزشی نسبت به تهیه اکانت ویژه از لینک زیر اقدام کنید .
دریافت اشتراک ویژه
مزیت های عضویت ویژه :
- دسترسی به همه مطالب سافت ساز بدون هیچ گونه محدودیتی
- آپدیت روزانه مطالب سایت از بهترین سایت های سی جی
- بدون تبلیغ ! بله با تهیه اکانت ویژه دیگه خبری از تبلیغ نیست
- دسترسی به آموزش نصب کامل پلاگین ها و نرم افزار ها
اگر در تهیه اشتراک ویژه مشکل دارید میتونید از این لینک راهنمایی تهیه اشتراک ویژه رو مطالعه کنید . لینک راهنما
For International user, You can also stay connected with online support. email : info@softsaaz.ir telegram : @SoftSaaz
امتیاز به این مطلب :
امتیاز سافت ساز
لطفا به این مطلب امتیاز دهید :)