مقدمه ایی بر نرم افزار Clarisse
FXPHD – CLS101 – Introduction to Clarisse
مقدمه ایی بر نرم افزار Clarisse
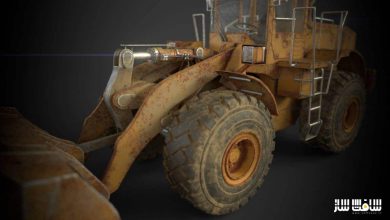
مقدمه ایی بر نرم افزار Clarisse : همانطور که میدانید امروزه نرم افزارهای زیادی برای امر کامپوزیت مورد استفاده قرار میگیرند و میتوان به مهمترین آن ها یعنی Fusion و Nuke اشاره کرد ولی اخیر یک نرم افزار بسیار مورد توجه قرار گرفته است.
نرم افزاری موسوم به Clarisse که فارغ از توانمندی آن در انجام کارهای کامپوزیت بلکه تعامل خوبی با نرم افزار های سه بعدی همانند مایا دارد مدرس این مجموعه یعنی James Miller سابقه زیادی در امر پرداخت دیجیتال و پردازش تصاویر سی جی دارد . این دوره آموزشی توسط تیم ســافــت ســاز برای شما عزیزان تهیه شده است.
عناوین اصلی دوره آموزشی :
- مقدمه نرم افزار
- تنظیمات و پیکر بندی پروژه
- ساخت و تنظیم متریال در نرم افزار
- استفاده از متریال Triplanar
- استفاده از Point Cloud
- استفاده از Cryptomates برای تفکیک متریال ها و استفاده از آن ها در نرم افزارهای کامپوزیت

عنوان دوره : FXPHD – CLS101 – Introduction to Clarisse
سطح : متوسط
زمان کل دوره : 3.14 ساعت
تعداد فایل های تصویری : 9
سال آموزش : 2017
فایل تمرینی : دارد
مربی دوره : James Miller
نرم افزار : Clarisse
زیرنویس انگلیسی : ندارد
FXPHD – CLS101 – Introduction to Clarisse
This course is aimed at giving you a thorough introduction of Clarisse, from the basics of how to use the software to render an image, through to creating bespoke AVO’s using the recently implemented light path expressions, as well as touching on many other features new in 3.5.
James Miller is a Generalist Digital Artist and has worked for companies such as Double Negative and Industrial Light and Magic, on blockbusters such as Star Wars, James Bond, Hunger Games and the Marvel films. He is currently based in San Francisco, California, and is one of the original Clarisse users, having been one of the artists to first use the program professionally. He continues to be part of the active professional user group, helping feedback on the continued development of the program.
Participants on this course is not expected to have any prior knowledge of Clarisse, but will find it helpful to be comfortable with the basics of 3d, such as asset types, UDIM workflows, planar projections, as well as the basics of scattering. There will be some light use of expressions, but no previous knowledge is required for this.
Introduction to ClarisseWatch our overview of the course
course syllabus
CLASS 1: INTRODUCTION
An introduction to the course. An overview of the interface, navigation within Clarisse, project structure, setting up our scene and how to import different asset types.
CLASS 2: SETTING UP THE PROJECT
Setting our project up from scratch to render an image, and organizing assets to render. Camera and context navigation, as well is looking and using combiners and groups for the first time.
CLASS 3: BUILDING AND WIRING MATERIALS
Building and wiring materials within Clarisse, on our hero, UV’d asset. Assigning materials using the material linker, as well as setting up basic look development parameters and lighting. We will also be looking at how to use bump and normal passes, as well the IOR options used in physically based rendering.
CLASS 4: TRIPLANAR MATERIAL AND MATERIAL EDITOR
Creating a triplanar material, and using the material editor. Also looking at using AOV’s to help us build and adjust our materials, as well as 3d displacement and the options available.
CLASS 5: POINT CLOUD AND SCATTER
Using the point cloud and scatter to create our rock distribution, as well as decimating that point cloud using the occlusion between the water and the rock surface. Creating water ripples using noise and animating the noise map.
CLASS 6: PLATES AND ASSETS
Importing our plate and adjusting our assets in 3d space to fit the composition. A brief look into colour space, using matte objects and lighting.
CLASS 7: CRYPTOMATTES
Applying cryptomattes to our AOV output, enabling motion blur, and creating utility passes like P-world, as well as material overrides on a layer level. Using light path expressions to create AOV’s to allow us to relight in nuke. Exploring shading layers as an alternative to the material linker. Finally creating layers and preparing to render.
CLASS 8: RENDERING
Final preparation for rendering, looking at material, light and raytrace samples, as well as when to use each one. Setting output paths, frame ranges and rendering.
CLASS 9: COMPOSITING
Compositing and looking at our AOV’s. Downloading and enabling cryptomattes and p_mattes in nuke, and how to relight using our light path expression outputs for each light.
حجم کل : 5.6 گیگابایت

برای دسترسی به کل محتویات سایت عضو ویژه سایت شوید
برای نمایش این مطلب و دسترسی به هزاران مطالب آموزشی نسبت به تهیه اکانت ویژه از لینک زیر اقدام کنید .
دریافت اشتراک ویژه
مزیت های عضویت ویژه :
- دسترسی به همه مطالب سافت ساز بدون هیچ گونه محدودیتی
- آپدیت روزانه مطالب سایت از بهترین سایت های سی جی
- بدون تبلیغ ! بله با تهیه اکانت ویژه دیگه خبری از تبلیغ نیست
- دسترسی به آموزش نصب کامل پلاگین ها و نرم افزار ها
اگر در تهیه اشتراک ویژه مشکل دارید میتونید از این لینک راهنمایی تهیه اشتراک ویژه رو مطالعه کنید . لینک راهنما
For International user, You can also stay connected with online support. email : info@softsaaz.ir telegram : @SoftSaaz
امتیاز به این مطلب :
امتیاز سافت ساز
لطفا به این مطلب امتیاز دهید :)