آموزش ریگ کردن حیوانات در مایا Maya
Rigging Quadrupeds in Maya
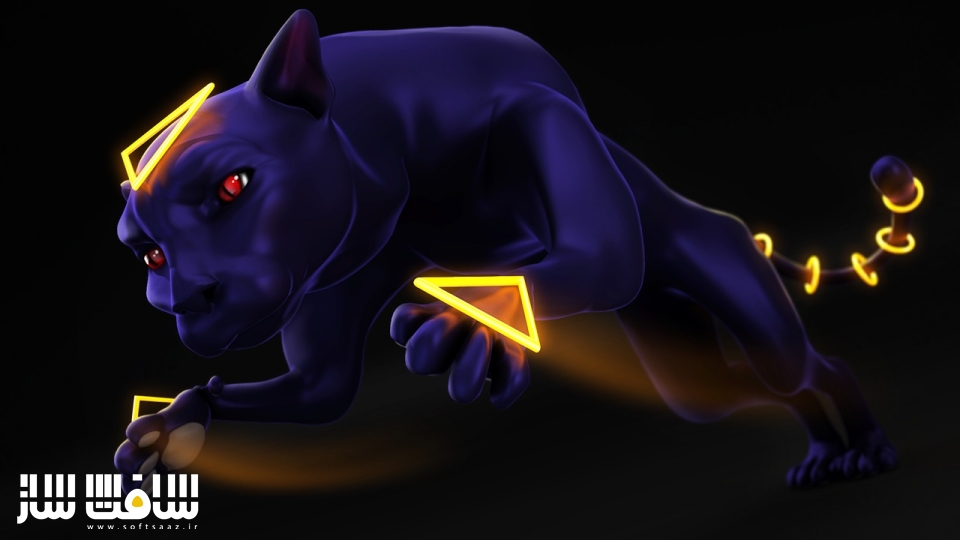
ریگ کردن حیوانات در مایا
در این آموزش نرم افزار Maya ، تکنیک های ضروری رو برای ریگ کردن حیوانات در مایا یاد خواهید گرفت.نحوه افزایش سیستم فلکسی ،ایجاد ریگ یک کاراکتر به صورت پیشرفته ، ساخت اسکلت موجود از سطح زمین ،چگونگی ساخت یک سیستم قوی ترکینگ ژست و نحوه اسکریپ چند ابزار را به کمک MEL یاد خواهید گرفت. با سافت ساز همراه باشید.
عناوین اصلی این دوره آموزشی:
- ایجاد سیستم فلکسی برای مهره ها و گردن
- کنترل پیچ پیشرفته سیستم فلکسی
- اکسپورت سیستم فلکسی
- استفاده از قفسه های سفارشی در مایا
- ایجاد ابزار برای حذف فضای نام ها
- افزودن مفاصل
- تنظیم اتصالات ، قفسه سینه و سر
- قرار دادن سیستم فلکسی به گردن
- کار با پوست
- تکنیک های پوست
- ردیاب ژست
- اضافه کردن سیستم IK
- کنترل سر
- اضافه کردن کنترل برای کتف
- استفاده از IK Spring Solver
- و …

لطفا قبل از دانلود پیش نمایش دوره را مشاهده فرمایید:
عنوان دوره : Digital-Tutors – Rigging Quadrupeds in Maya
سطح : متوسط
زمان کل دوره : 6.21 ساعت
تعداد فایل های تصویری : 42
سال آموزش : 2013
فایل تمرینی : دارد
مربی دوره : Delano Athias
نرم افزار : Autodesk Maya 2014
زیرنویس : ندارد
Digital-Tutors – Rigging Quadrupeds in Maya
In this set of tutorials we will learn techniques for rigging quadrupeds in Maya.We’ll start by learning how to enhance the Flexi system we created in Advanced Character Rigging in Maya, making it more robust for spines, necks, and areas of the like, while making sure to keep this modular component clean and animator-friendly. We’ll then build our creature’s skeleton from the ground, up, and learn how the Flexi rig can be easily inserted to save us a lot of time. We’ll also learn how to create a robust pose tracking system for driving corrective targets, as well as how to script a few tools with MEL to work faster. By the end of this course, you will have the skill set needed to rig your own quadrupeds with confidence.
01. Introduction and project overview 01:13
02. Creating a Flexi system for the vertebrae and neck 08:50
03. Constraining joints to the Flexi surface 13:12
04. Adding controls to our Flexi rig 13:08
05. Bending the Flexi rig 09:58
06. Finishing our bend control 12:32
07. Advanced twist control for the Flexi system 05:52
08. Creating a node network to regulate our twist control 17:46
09. Volume control for the Flexi system 04:26
10. Setting up a node network for squash and stretch control 13:53
11. Cleaning up and exporting the Flexi system 04:42
12. Utilizing custom shelves in Maya to increase your productivity 06:40
13. Creating a tool to remove namespaces 11:55
14. Building joints that will deform the creatures hind legs 12:10
15. Adding joints for the pelvis and tail 08:23
16. Adding joints for the front legs and scapulae 09:09
17. Setting up joints for the thorax, head, and root 06:23
18. Building joints for the ears 04:34
19. Creating a global node and adding the Flexi system to the vertebrae 12:22
20. Inserting the Flexi system into the neck 08:39
21. Skinning 09:40
22. Skinning techniques 12:39
23. Developing your own pose tracker 12:51
24. Finishing the pose tracker 18:21
25. Creating corrective targets for the deltoids 13:47
26. Installing our pose tracker 08:51
27. Setting up our space tracker on the right shoulder 06:12
28. Adding influence objects to jiggle the thigh muscles 08:32
29. Adding influence objects to deform the fingers and toes 13:36
30. Adding IK systems 04:53
31. Controlling the Flexi systems connected to the vertebrae and neck 05:17
32. Controlling the head 09:59
33. Driving the ears 11:31
34. Adding controls for the scapulae 04:38
35. Jiggle controls 05:17
36. Center-of-gravity control 07:07
37. Rigging the tail 06:20
38. Creating leg controls 09:36
39. Finishing our leg controls 08:08
40. Adding finger and toe controls 09:48
41. Cleaning up the rig 03:49
42. Adding a global control curve and working with selection sets 05:18
حجم کل :

برای دسترسی به کل محتویات سایت عضو ویژه سایت شوید
برای نمایش این مطلب و دسترسی به هزاران مطالب آموزشی نسبت به تهیه اکانت ویژه از لینک زیر اقدام کنید .
دریافت اشتراک ویژه
مزیت های عضویت ویژه :
- دسترسی به همه مطالب سافت ساز بدون هیچ گونه محدودیتی
- آپدیت روزانه مطالب سایت از بهترین سایت های سی جی
- بدون تبلیغ ! بله با تهیه اکانت ویژه دیگه خبری از تبلیغ نیست
- دسترسی به آموزش نصب کامل پلاگین ها و نرم افزار ها
اگر در تهیه اشتراک ویژه مشکل دارید میتونید از این لینک راهنمایی تهیه اشتراک ویژه رو مطالعه کنید . لینک راهنما
For International user, You can also stay connected with online support. email : info@softsaaz.ir telegram : @SoftSaaz
امتیاز به این مطلب :
امتیاز سافت ساز
لطفا به این مطلب امتیاز دهید :)